Showing posts with label DIY. Show all posts
I bought this dress at Khol's without trying it on. So when I did try it on, I realized exactly why it was on sale: the fit was awful. As you can see the bubble action going on above {the images make it look slightly more attractive than it really looked in person}. It was the perfect opportunity for me to rework it into a skirt. All I did was cut off the top and now I have a versatile piece to add into my wardrobe. And did I mention this piece was only $8.00!?

Steals & Deals: Old Navy Top//Lauren Conrad Dress, $8.00//Ebay Cateye Sunglasses, $10.00//Target Fedora, $12.99//Michael's Chain Bracelet, $1.99

I am officially back to the blogging world, after a crazy couple of weeks at school! {Not sure how I made it through}. I am so excited for what I have in store for all of you. This repurpose project that I did above is the first amongst many others that I will share with you in the next couple weeks. I am basically revamping a good portion of my wardrobe to make what I already have more wearable. As I mentioned previously, I have been trying to spend frugally to save for my trip to New York. However, I do need to add some more bottoms to my wardrobe. So that is exactly what I am doing, without spending a thing! Yay! I am taking various items that sit in my closet and transforming them into pieces that fit better, work with current trends, and are more useful. Awesome, right? 

Well I hope everyone is having a great week. xo
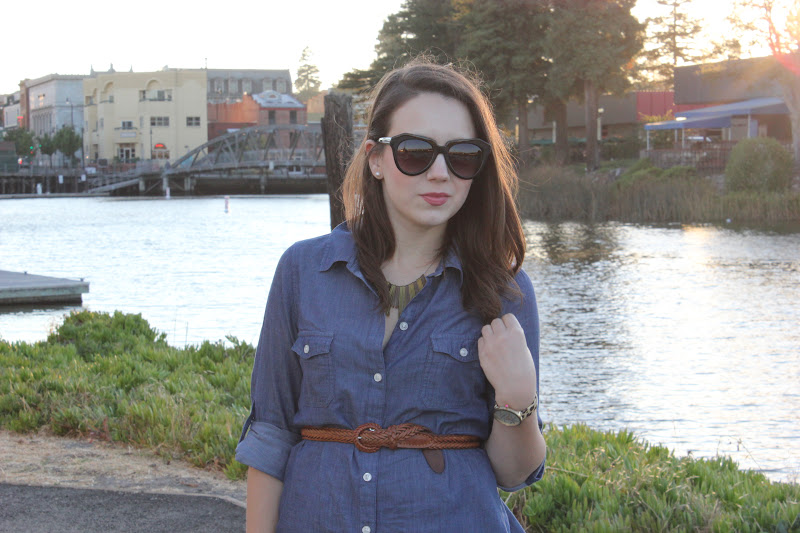
Okay so for this DIY, you can be creative as you like making your necklace as customized as you like. All you do is take a necklace chain you already have, string through 2 different bobby pin sizes {more or less depending on the look you are going for}, create a pattern to your liking and you have a full on gorgeous statement necklace for $7.00! 

Steals & Deals: Old Navy Chambray Shirt, $12.00 {In the City with Crystalin's Closet}//Target Stripped Skirt, $6.00//Leather Gold Pumps {thrifted}, $7.50//Belt {vintage from my mom's closet}//H&M Ring, $5.00//Cateye Sunglasses {Sunglass Army}, $10.00

Okay so I am pretty excited about this post. First off, I really like my new necklace I made out of bobby pins, yes I made a statement necklace out of bobby pins and it was only $7.00 {hell yes}!! I have basically been wearing it everyday. Yeah, I get obsessed with pieces that I like. Please tell me I am not the only one! Also, I just really like this outfit. Let me just throw it out there, but it is a comfortable outfit. I mean a loose shirt and a knit skirt pretty much scream comfort. But just because it an outfit is comfortable does not mean it needs to be frumpy. The accessories really help pull everything together. The waist belt adds a shape and the jewelry and heals add polish. This is my kind of outfit. {Hope everyone likes it as much as I do!}

Oh yes, and I hope everyone had a lovely weekend! xo

Dip Dye Tank


Steals & Deals: Dip Dye Tee {DIYed}, $2.40//Ebayed Cateye Sunnies, $7.95 {vender}//Coach cross body {Mom's closet}//J Crew Toothpick Cords
Chloe and Isabel Jewelry: Pearl Stud Earrings

This is my somewhat subtle 4th of July spirited look that I wore yesterday--pairing blue and white with red accents. I have been needing cotton tanks and I have been in a craft craze so I decided to make this tank myself. I was inspired by Acne's resort collection {the designer}, especially {this} and {this} look. It was extremely simple to make and cost effective. Here is what I did:

1) Purchased a basic short sleeve t-shirt from Michael's {$3.99 + 40% off--coupons are available online}. 

2) I placed another tank on top of the t-shirt and used it as a template and cut the t-shirt into a tank top.

3) Dipped the top half of the shirt in a bucket of bleach for about 4 minutes. 

4) Left the shirt out to dry over night. 

The shirt did not turn out how I expected for two reasons: first it didn't turn white, also the bleach got on the non-bleached half. Even with that said, I still think the overall effect looks great. I mean who doesn't want a new tank top, that is designer inspired for only $2.00!?

Hope everyone had a great holiday. Tomorrow is Friday...yipee! xo

Fascinator DIY

What you will need: 

(1) BRIMMED HAT
Make sure that the material is flimsy and not too thick. Otherwise it will be difficult to cut and fold. This was a hat I already hat, if you do not already have a hat in mind (which I do not expect you to have), I suggest purchasing one used at a thrift store.

(2) SCISSORS
You will need a good pair to cut your hat.

(3) FABRIC or RIBBON
Or really any fabric you have lying around, even a ribbon will do. Otherwise if you go to a fabric store they always have a remnants section which is left over fabrics for a small price.  

(4) NETTING
Can be found at any basic fabric store such as Joanns. The clerk helped me find this material in no time.

(5) NEEDLE & THREAD

(6) HOT GLUE GUN  

(7) IRON
This is only if you are using fabric to create the bow. 


Hot gluing the edges will ensure that the hat does not fray. Make sure all of the broken edges are glued with the gun. I also contemplated sewing around the edges with my sewing machine, but decided to hold off on this strategy and not break my machine.

The most important part of this step is making sure that the top side or good side of your hat is flat and fits well on your head. I tested out the shape and look on my head before sewing the sides together. Also, make sure to thoroughly sew the sides together. You just need to make sure that it will be secure enough to not break.

This step is strictly to create the bow. Ignore if you are using a ribbon.


Now glue on bow and flower to the main piece. As for the placement of the netting, bow and flower--be creative! This is the part that you can do whatever you'd like to personalize your fascinator. Make sure to have fun and make it your own.


When going to Anthropologie and discovered the fascinator, the Beaufort Bibi for $378...I said, "I can make this for less!" And then I created this DIY. This hat only cost me about $5.00 considering I had most of the material already and only bought the netting. It is a perfect piece to wear at a Wedding or your own, to high tea, to church, or just because you feel like spicing up your wardrobe.

I hope you enjoy this post. Please feel free to drop me any questions at brokewithdesignertaste {at} gmail {dot} com, or within a comment section below. xo